Your refrigerator isn’t cooling. The technician’s diagnosis just landed in your inbox: compressor failure. The quoted price? Somewhere between $1,300 and $1,500. Now you’re staring at two paths—shell out that money for a repair, or replace the entire unit. The problem is, you don’t know which choice actually makes financial sense for your situation.
You’re not alone in this dilemma. A failing compressor is one of the most expensive appliance repairs homeowners face, and the decision between repair and replacement hinges on several factors that vary dramatically from one household to the next. The right answer for a 3-year-old high-end refrigerator is completely different from the answer for a 12-year-old basic model gathering dust in your garage.
This guide breaks down exactly what you need to know: what compressor repair actually costs in 2026, how those costs stack up against buying new, and a straightforward decision framework to help you avoid spending money you shouldn’t—or making a premature replacement you’ll regret.
What’s Causing This Problem
Before diving into costs, let’s talk about why your compressor failed in the first place. Understanding the cause won’t change the repair bill, but it might inform whether repair or replacement is truly your best option.
The most common culprits, ranked by frequency:
-
Age-related wear and tear — Compressors typically last 8–12 years under normal conditions. Once a refrigerator hits that decade mark, the compressor’s motor windings degrade, seals deteriorate, and mechanical components simply wear out. This is the most common failure mode, accounting for roughly 40% of compressor failures.
-
Electrical failure — Power surges, voltage fluctuations, or a faulty run capacitor can overload the compressor motor. A failed capacitor is actually cheaper to replace ($150–$300) than a full compressor, which is why technicians always test this component first. This accounts for about 25% of compressor “failures” that are actually easier fixes.
-
Refrigerant leaks — When refrigerant escapes through a crack in the lines or a faulty connection, the compressor runs dry and overheats. Leaks are particularly common in cheaper models where copper tubing corrosion eats through the line walls over time. The leak itself needs sealing (additional cost), and the refrigerant needs replacement.
-
Valve plate damage — Inside the compressor, valve plates regulate refrigerant flow. If debris circulates through the system (from a failed filter), it can damage these valves, reducing efficiency or causing complete failure. This typically affects older units or those with poor maintenance histories.
-
Locked rotor or mechanical seizure — Sometimes the compressor’s internal mechanisms literally freeze up, usually due to liquid slugging (liquid refrigerant entering the cylinder instead of vapor) or severe contamination. When this happens, the compressor won’t run at all, and repair isn’t really an option—replacement is necessary.
Early warning signs you might have ignored:
- Unusual noises: clicking, humming, or grinding sounds (especially when the compressor kicks on)
- Food warming despite thermostat set to cool
- Excessive cycling (compressor running constantly)
- Higher-than-normal electricity bills
- Warm condenser coils (you should feel heat, but not intense heat)
The more important insight: these failures rarely happen without warning. If your refrigerator started showing symptoms weeks or months ago, the compressor has been working under stress. This context matters for the repair-vs.-replace equation—a compressor that failed suddenly might be worth fixing, while one that’s been limping along for months suggests the unit is nearing end-of-life anyway.
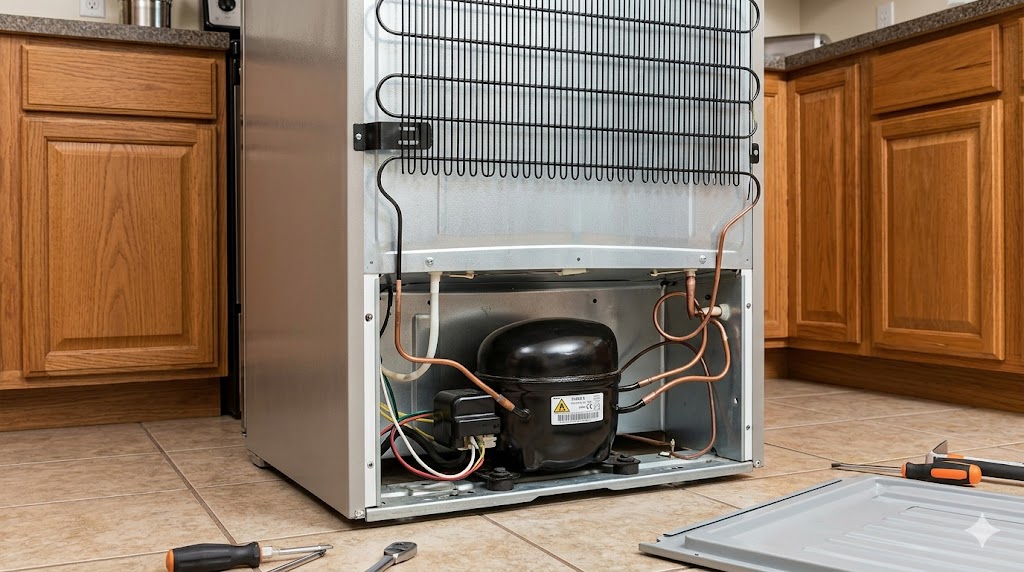
Tools and Parts You’ll Need
Before we go further, I need to be direct about something: you cannot legally repair a refrigerator compressor yourself. The EPA requires EPA Section 608 certification to handle refrigerants, and attempting this repair without it is both illegal and dangerous. The refrigerant in your unit is hazardous, pressurized, and requires specialized equipment to safely remove and dispose of.
That said, understanding what the repair actually involves—and what parts your technician will reference—helps you understand the cost breakdown and evaluate quotes intelligently.
What a technician will need:
-
New compressor unit ($300–$500, depending on brand and model)
- LG compressor assembly (model-specific): $350–$450
- GE/Hotpoint compressor: $280–$380
- Whirlpool compressor: $320–$420
- Premium brands like Sub-Zero: $500–$700
-
Replacement filter-drier ($40–$80)
- Removes moisture and contaminants from the refrigerant circuit after the repair
- This is a consumable and should always be replaced during compressor service
-
EPA-approved refrigerant ($100–$200, depending on type)
- Modern units typically use R-134a or R-600a refrigerant
- Older units might use R-12 (phased out but sometimes kept in circulation, at higher cost)
- The refrigerant quantity varies by model (typically 0.5–2 lbs)
-
Gaskets, O-rings, and sealants ($20–$50)
- Needed to ensure the new compressor seals properly
-
Diagnostic equipment and labor (~$1,000 all-in)
- This includes testing, EPA-certified installation, evacuation/charging procedures, and system pressure testing
Why you can’t find these parts on Amazon: Many of these components (especially the compressor and refrigerant) are restricted and won’t ship to consumers without proof of EPA certification. This isn’t a barrier designed to keep you buying through professionals—it’s a legitimate environmental and safety regulation.
Step-by-Step: What the Repair Actually Involves
This is for understanding only—your technician handles the actual work. But here’s exactly what the repair process looks like so you understand what you’re paying for:
1. Diagnosis and pressure testing The technician connects gauges to the high and low pressure sides of the compressor circuit. This confirms whether the compressor has actually failed or if it’s a simpler electrical issue (failed capacitor, loose connection). This step takes 15–30 minutes and is usually factored into the service call fee.
2. Evacuation of refrigerant Using an EPA-approved recovery machine, the technician removes all refrigerant from the system and stores it in a certified container. This must be done before any compressor work happens. Takes 20–40 minutes depending on system size.
3. Removal of the failed compressor The compressor is unbolted from the cooling circuit. The technician carefully disconnects lines, removes the unit, and sets it aside for proper disposal.
4. Installation of the new compressor The replacement compressor is bolted into place and all connections are re-attached. Any rubber seals or gaskets are replaced to prevent leaks.
5. Installation of a new filter-drier A new filter-drier is installed in the circuit to absorb any moisture that entered during the repair and trap remaining contaminants. Skipping this step risks premature failure of the new compressor.
6. System evacuation (vacuum pull-down) Before refrigerant is reintroduced, the entire system must be evacuated to remove air and moisture. A specialized vacuum pump runs for 30 minutes to an hour. This is non-negotiable for system longevity.
7. Refrigerant charge The correct amount of refrigerant is introduced back into the system per manufacturer specifications. The technician uses a scale to measure the charge precisely—too little means poor cooling, too much means compressor overload.
8. Pressure and temperature testing Final gauges confirm that high and low pressures are in the correct range, and that evaporator and condenser temperatures match expected values.
Total time on-site: 2.5–4 hours for a full compressor replacement.
Alternative Fixes to Check First
Not every compressor failure requires a $1,300+ repair. Before committing to a full replacement, a good technician should have already checked these:
-
The run capacitor — A failed capacitor can look exactly like compressor failure. Replacing it costs $150–$300 and takes 30 minutes. If your quote is for a full compressor but the technician hasn’t mentioned testing the capacitor, ask specifically about it.
-
The contactor relay — Similar to the capacitor issue, a bad contactor can prevent the compressor from starting. This is a $100–$200 fix.
-
Minor refrigerant leaks — If the leak is in an accessible fitting or connection (not in the compressor itself), sealing and recharging ($300–$600) might buy you several more years.
-
Frozen evaporator coils — If the coils are iced over, the fridge won’t cool even though the compressor is running fine. Usually a failed defrost timer or thermostat. Costs $150–$400 to fix.
-
Failed evaporator fan motor — This fan pulls cold air from the freezer to the fridge side. If it fails, the fridge side stays warm while the freezer is still cold. Replacement costs $200–$400, not $1,300.
The takeaway: always get a diagnostic first. A reputable technician confirms the compressor is actually the failure point before quoting replacement.
How to Prevent This Problem
Once your refrigerator is repaired or replaced, here’s how to extend the life of the new compressor:
- Clean condenser coils twice yearly — Dust and pet hair force the compressor to work harder. Vacuum the coils (usually behind the fridge or under the front grill) every 6 months.
- Don’t block air vents — Keep the area around your refrigerator clear for air circulation.
- Keep door seals clean — Worn or dirty seals let cold air escape. Replace cracked seals ($100–$200) before they cause compressor damage.
- Set the thermostat correctly — Don’t set the fridge colder than necessary. Most manufacturers recommend 37–38°F for the fridge compartment.
- Don’t overload the fridge — Too-full units restrict airflow and force longer compressor run cycles.
Repair vs. Replace: The Decision Framework
This is the decision that matters. Here’s a clear framework.
First, the uncomfortable truth: For many homeowners, compressor repair is financially irrational in 2026. A $1,300–$1,500 repair on a 10-year-old refrigerator makes little sense when a new, reliable unit costs $800–$2,500 and comes with a 1–3 year warranty.
But there are legitimate scenarios where repair wins.
Cost Comparison Table: Repair vs. Replace (2026)
| Refrigerator Age | Repair Cost | New Unit Cost | Recommendation |
|---|---|---|---|
| 0–3 years | $1,300–$1,500 | $1,500–$3,500 | REPAIR — Unit is young; warranty likely covers part cost |
| 3–5 years | $1,300–$1,500 | $1,200–$2,800 | REPAIR — Still worth fixing if quote is on lower end; check warranty first |
| 5–8 years | $1,300–$1,500 | $900–$2,200 | DEPENDS — If repair is under $1,200 and unit is premium brand, repair. Otherwise, replace. |
| 8–12 years | $1,300–$1,500 | $800–$2,000 | REPLACE — Repair rarely pays off; new unit includes warranty protection |
| 12+ years | $1,300–$1,500 | $700–$1,800 | STRONGLY REPLACE — Unit is at end-of-life; repair extends life only 2–3 years |
Check Your Warranty First
Before making any decision, check your refrigerator’s warranty. Most major manufacturers (LG, Samsung, Whirlpool, GE) cover compressor replacement for 5 years from purchase, and some extend to 10 years if you registered the unit. If you’re still covered, you only pay labor (~$300–$500), not the full $1,300+.
- LG: lg.com/us/support
- Samsung: samsung.com/us/support
- Whirlpool: whirlpoolcorp.com/support
- GE Appliances: geappliances.com/service
When Repair Makes Sense (Even Without Warranty)
-
Your refrigerator is a premium model (Sub-Zero, Miele, or higher-end LG/Samsung). These units cost $3,000–$6,000+ new. A $1,300 repair extends life by 5+ years and is justifiable.
-
You got a quote under $1,200 — Some technicians and regions have lower labor rates, which can tip the math toward repair even on a mid-age unit.
-
The unit is less than 5 years old — Even without warranty, a nearly-new refrigerator is worth repairing. The replacement cost and hassle don’t justify tossing a unit that has years of useful life remaining.
When Replacement Makes Sense
-
The unit is 8+ years old — You’re likely 2–4 years from the next major failure. A repair buys you a short runway on an aging appliance.
-
The repair quote exceeds 50% of a new unit’s cost — This is the classic appliance rule of thumb, and it applies here. If a new comparable fridge costs $1,400 and the repair is $1,300, buy new.
-
The unit has had multiple recent repairs — A compressor failure after a recent motor, fan, or control board repair signals systemic decline. Don’t keep funding a dying appliance.
-
Energy efficiency matters to you — Refrigerators made before 2015 use 15–30% more electricity than modern Energy Star models. The energy savings from a new unit partially offset the purchase cost over 5–10 years.
Bottom Line
A refrigerator compressor repair in 2026 costs $1,300–$1,500 all-in. Whether that’s worth paying depends almost entirely on your unit’s age and warranty status.
The short version:
- Under warranty? Repair — you only pay labor.
- Under 5 years old, no warranty? Repair — the unit has plenty of life left.
- 5–8 years old? Do the math — compare repair cost to a new unit’s price.
- Over 8 years old? Replace — the repair cost doesn’t pencil out.
If you’re in the Edmond or OKC area and need a diagnosis before deciding, call us at 405-730-9131. We’ll tell you honestly whether the repair makes sense for your specific unit — no upsell, no pressure.